

This article is specifically about table constraints. USoft also has something called domain constraints.
When USoft developers talk of “constraints”, they usually mean “table constraints”. Many applications have a lot of table constraints and only a limited number of domain constraints.
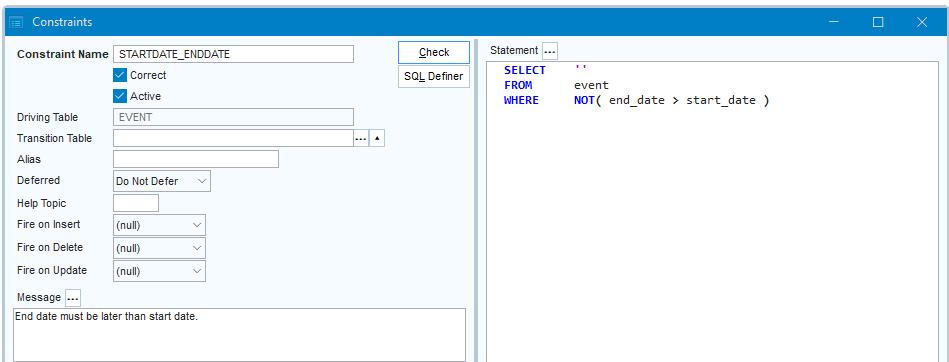
A table constraint, in USoft technology, is a SQL statement that enforces specific combinations of column values in 2 or more columns. For example, if you keep period information about events, a table constraint could enforce that the end date is always later in time than the start date:
SELECT     ''
FROM       event
WHERE      NOT( end_date > start_date )
Another constraint could enforce that the end date is always set to the start date plus the number of days set for the programme run by the event:
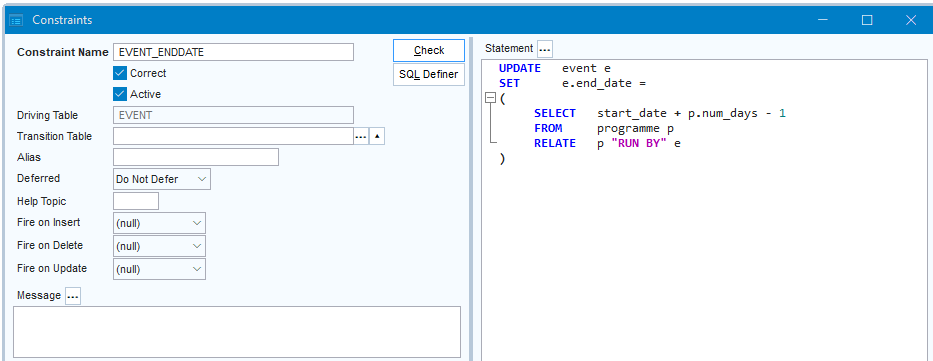
UPDATE   event e
SET      e.end_date =
(
     SELECT   start_date + p.num_days - 1
     FROM     programme p
     RELATE   p "RUN BY" e
)
If you have the second constraint (the UPDATE constraint), you don't need the first (the SELECT constraint), assuming of course that num_days is always a positive integer (1 or higher), which is a fair assumption that you can easily enforce.
Each constraint enforces a form of data integrity. The first constraint makes it impossible to enter a value combination where the end date is later than the start date. The second constraint forceably produces an acceptable end date in all cases.
To enforce that 1 column value (as opposed to combinations of 2 or more column values) follows a certain pattern, you don’t need a table constraint. Use a domain constraint or a domain attribute.
Restrictive (SELECT) table constraints
Constraints with a SELECT statement are restrictive.
A restrictive table constraint checks each combination of values. If the values go against what you want to allow, processing is blocked, and the table constraint gives an error message. The result is that the violating values are not stored in the database.
Example
"A passenger cannot participate in two tours that overlap in time."
This constraint automatically guarantees that no value combinations are allowed that would imply a passenger is double-booked. This will happen, for example, when a passenger double-books himself, but also when the organisation makes a change in the start date or end date of any tour.
Productive (INSERT, UPDATE, DELETE) table constraints
Constraints with an INSERT, UPDATE, or DELETE statement are productive.
A productive table constraint automatically performs some data manipulation that causes a combination of data values to satisfy a data integrity rule. It creates a value combination that is acceptable, that you want to allow.
A productive constraint typically operates in silence: it does not give a message. If you do specify a message, this message will show as a message of type Warning (and not: Error, as is the case with restrictive constraints) each time the constraint produces a value.
Example
"The price of a booking is set to the price per booking times the number of participants in the booking, minus any applicable discounts".
This constraint automatically calculates the price. It also automatically re-calculates the price any time one of the price components changes.
How to write a restrictive (SELECT) table constraint
To write a restrictive table constraint:
1. In the left-hand catalog, on the Model and Rules tab, find the Constraints, Table Constraints node.
2. Double-click this node, or right-click and choose New Table Constraint. Alternatively, you can choose Define, Constraints, Table from the main menu.

The Constraints window is opened.
3. In the Constraint Name field, enter any unique name for the constraint.
4. In the Message field, enter the error message that you want the constraint to give if an attempt is made to enter disallowed values.
5. In the Statement field, formulate the SELECT statement that expresses what combinations of values you want to disallow.
In other words, you write in the SELECT statement what you do NOT allow.
In the SELECT output list, just select a single-quoted empty string. This is because you are not interested in retrieving values from the database. You are only interested in defining what are disallowed value combinations:
SELECT ''Now have the constraint checked. This step is essential. See "Having the constraint checked” later in this article.
Example 1
To define a constraint that gives an error if the end date of an event is not later in time than the start date, write:
SELECT    ''
FROM      event
WHERE     NOT( end_date > start_date )
Alternatively, you can write:
SELECT    ''
FROM      event
WHERE     end_date <= start_date
Example 2
To define a constraint that gives an error if a booking is paid before it is confirmed, write:
SELECT     ''
FROM       booking
WHERE      paid = 'Y'
AND        confirmed = 'N'
Example 3
To define a constraint that gives an error if a passenger participates in two tours that overlap in time, write:
SELECT    ''
FROM      passenger p
,         tour t1
,         tour t2
RELATE    p "PARTICIPATES_IN" t1
,         p "PARTICIPATES_IN" t2
WHERE     t2.start_date > t1.start_date
AND       t2.start_date < t1.end_date
How to write a productive (INSERT, UPDATE, DELETE) table constraint
To write a productive table constraint:
1. In the left-hand catalog, on the Model and Rules tab, find the Constraints, Table Constraints node.
2. Double-click this node, or right-click and choose New Table Constraint. Alternatively, you can choose Define, Constraints, Table from the main menu.
The Constraints window is opened.
3. In the Constraint Name field, enter any unique name for the constraint.
4. In the Statement field, formulate an INSERT, UPDATE or DELETE statement that expresses what you want the constraint to produce.
Now have the constraint checked. This step is essential. See "Having the constraint checked” later in this article.
Example 4
To define a constraint that guarantees that the end date of each event is set to the start date plus the number of days set for the programme run by the event, write:
UPDATE   event e
SET      e.end_date =
(
     SELECT   start_date + p.num_days - 1
     FROM     programme p
     RELATE   p "RUN BY" e
)
Example 5
To define a constraint that automatically qualifies each passenger older than 70 as a special needs customer, write:
UPDATE  passenger p
SET     p.special_needs = 'Y'
WHERE   70 <
(
     SELECT     FLOOR(
                  ( b.book_date -
                       USFormatUSFormat.CharToDate( b.birth_date, 'DD-MON-YYYY' )
                ) / 365
     )
     FROM       booking b
     WHERE      b.id = p.booking_id
)
Having the constraint checked
To have the constraint checked:
1. Click the Check button.
If the table constraint is correct, the checker will set the Correct = Yes flag.
If the constraint is not correct, a message is shown with an asterisk (*) at the position of the syntax error. Review your SQL and then press Check again, until the constraint is correct.
This step is essential. Your constraint will NOT have an effect as long as Correct = No. When you create a .CON flatfile you are warned about the existence of incorrect constraints, but when you run from repository, as you are likely to do in Development, this behaviour can be confusing.
2. Click Save to save work.
You can switch constraints off by setting Active = No. This can be practical for quick testing and debugging. Try not to release any inactive constraints. Even in Development, keep inactive constraints to a minimum: switch them back on as soon as possible.
In summary, best practice is for all your constraints to have both Correct = Yes and Active = Yes.
INVOKE constraints
USoft also allows you to define constraints executed by a Java or .NET component action. These constraints use the non-SQL, USoft-specific INVOKE keyword.
Like SQL-style constraints, INVOKE constraints ultimately guarantee some aspect of data integrity or integrity of behaviour. Also, like their SQL-style counterparts, each has either a restrictive or a productive effect.
For components in USoft Definer, go to the Extensions page.
For the INVOKE syntax, go to INVOKE in the SQL syntax section.